Quickstart Guide
Tutorial
Setting up Addressables in your Spatial Creator Toolkit project is as simple as setting up any other Unity project! If you have already used Addressables before, then you are likely familiar with most of these setup steps.
Tip
You can also find a separate template project with more in-depth logic here.
Step 1: Initialize Addressables
Open up the Spatial Portal window in Unity, navigate to the Utilities tab, then press the Initialize for Project button under the Addressables section.

You should now see the AddressableAssetsData folder hierarchy generated from the initialization. This directory and its subdirectories should not be renamed or moved to ensure compatibility.
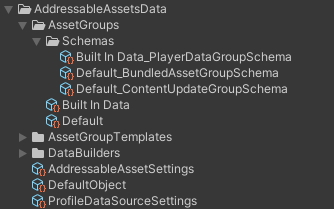
Without the presence of the AddressableAssetsData or the AssetGroups subdirectory, Addressables will be disabled. More details about the Addressables build process can be found in the Build Process page.
Step 2: Creating a Physics Cube for Testing
Create a new Cube in the scene and drag it into a folder of your choice in the Project view to convert the game object to a prefab. Add a Rigidbody component to the prefab asset.
Important
Be sure to delete the prefab instance from the scene to ensure it's not included in your main scene bundle. No other asset in the project should be referencing the prefab at this point.
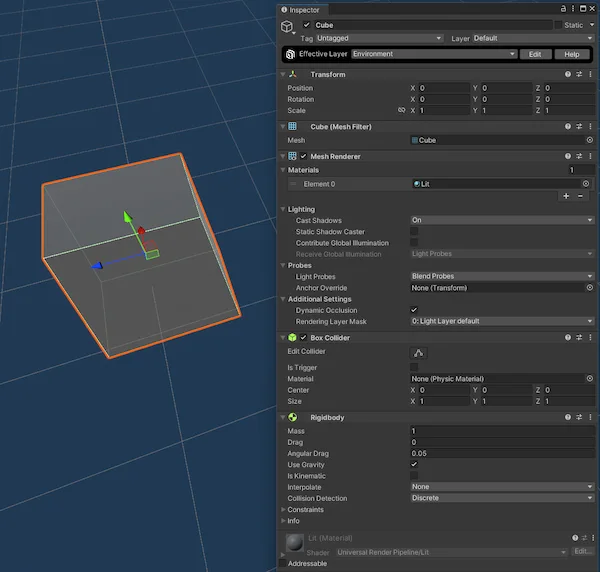
Step 3: Marking the Prefab as Addressable
Right now, the Cube prefab is not recognized by the Addressables system, so let's fix that!
Select the prefab asset and tick the checkbox near the top of the Inspector view that is labelled Addressable. This will automatically generate an Addressable name and add it to the default asset group. The Addressable name can be changed manually through the input field to anything you desire, but typically the chosen name shouldn't conflict with other Addressable assets to avoid confusion.
Click the Select button next to the input field, which will open the Asset Groups window (also accessible through the Window > Asset Management > Addressables > Groups menu item). You should see the Cube prefab under the default asset group.
Tip
You can also drag the prefab asset from the Project view into this window to add it to the desired group.

If you wish, you can continue adding assets. Additional asset groups can also be created to separate different asset types or use different build settings, such as the bundle packing mode, that is optimal for the group's use case.
Step 4: Loading the Cube via C#
Now that the Cube prefab is Addressable, you can begin referencing it throughout your C# scripts. Let's create a simple, interactable spawner script that instantiates the Cube and throws it in a random upward direction.
-
Create or assign a C# assembly in your Space config.
-
Add
Unity.AddressablesandUnity.ResourceManagerto your C# assembly'sAssembly Definition Referenceslist, as shown below, and clickApply.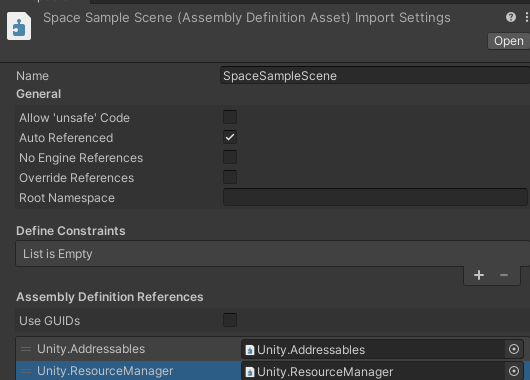
-
Create a new script next to your C# assembly named
AddressableSpawner.csand replace its contents with the code below. -
In your scene, create an empty game object that will serve as the interactable spawner, then add the
AddressableSpawnerscript to the object and assign theCubeAddressable prefab in theInspectorview.Add the Spatial Interactable component to the spawner. Then, create a new
Unity Evententry underOn Interact Event, assign the target object to the spawner itself, and selectAddressableSpawner.DoSpawnCube()as the invocation target. Feel free to customize the other fields in the Spatial Interactable component to your liking.In the end, this is what it should look like:
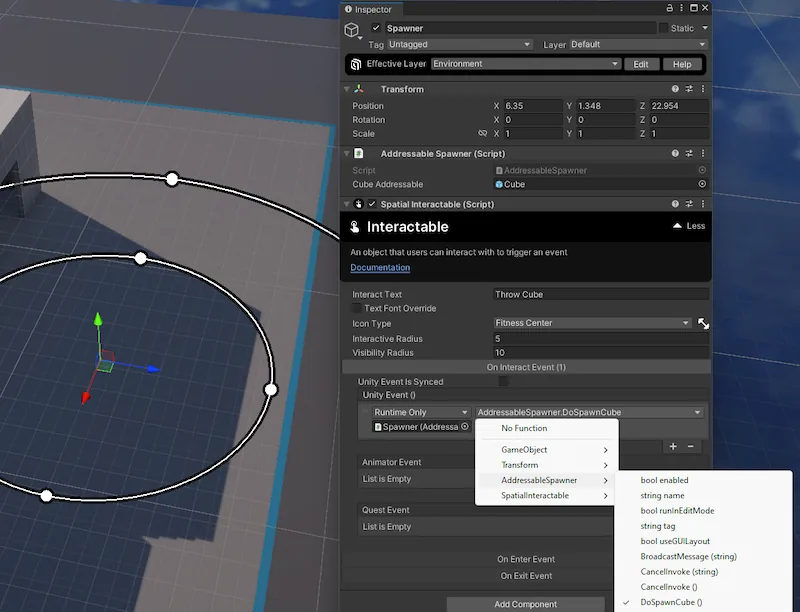
Don't forget to save your scene.
Step 5: Testing in the Sandbox
The spawner should be all set up, so let's see it in action! Click on the Test Active Scene button to test out these changes. You should see cubes spawning and flying up when you interact with the spawner. When the cube spawns in for the first time, there will be a brief delay as the asset bundle downloads.

That's it! The cube should not be included in the main asset bundle, and it was only downloaded when necessary, which saved some load time and memory. The performance improvements will be more noticeable as you convert more assets to Addressables.
What's Next
- Learn about best practices on how and how not to use Addressables.
- Review some of Spatial's limitations on Addressables.
- Dive deeper by reading through the official Addressables API scripting reference and documentation.